
Keeping your mountain bike in good condition is essential for ensuring a safe and enjoyable ride. One of the most important components of your bike that requires regular cleaning and maintenance are the brake pads. Clean brake pads are essential for effective braking, and neglecting them can lead to reduced stopping power, noisy brakes, and even dangerous accidents.
Mountain bike brake pads can become contaminated with dirt, oil, and other debris from the trail. This can cause poor braking performance and even damage to your bike’s braking system. Cleaning your brake pads regularly is essential for maintaining their effectiveness and prolonging their lifespan. In this article, we will guide you through the process of cleaning your mountain bike brake pads, from identifying contaminants to post-cleaning maintenance.
Key Takeaways
- Regular cleaning of your mountain bike brake pads is essential for effective braking and prolonging their lifespan.
- Proper preparation and use of appropriate tools are important for the effective cleaning of brake pads and calipers.
- If you encounter any issues during the cleaning process or notice reduced braking performance, it may be time to visit a bike shop for professional assistance.
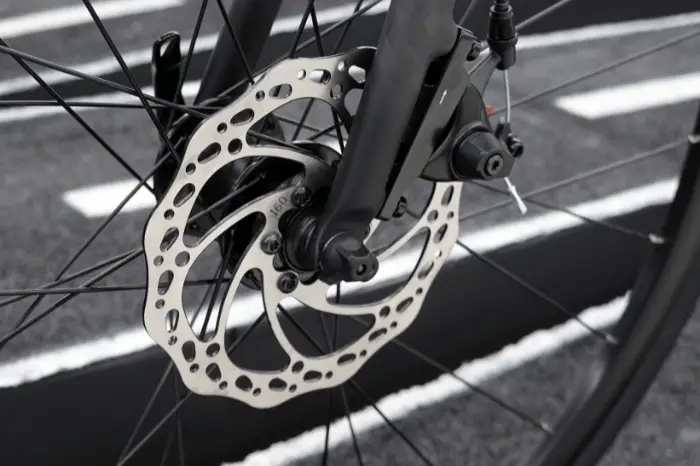
Understanding Mountain Bike Brake Pads
When it comes to mountain bike brakes, the brake pads are one of the most important components. They are responsible for creating friction against the rotor, which slows down or stops the bike. In this section, you will learn about the different types of brake pads, their materials, and how to choose the right ones for your bike.
Types of Mountain Bike Brake Pads
There are two main types of mountain bike brake pads: metallic and organic. Metallic brake pads are made of metal fibers and are known for their durability and longevity. They are ideal for downhill and aggressive riding, as they can handle high temperatures and provide consistent braking power. However, they can be noisy and wear down the rotor faster than organic pads.
Organic brake pads, on the other hand, are made of natural materials such as rubber, resin, and kevlar. They are quieter than metallic pads and provide better modulation, which means you can control the braking power more precisely. They are also gentler on the rotor and don’t produce as much heat. However, they wear down faster than metallic pads and are not as suitable for extreme riding.
Brake Pad Materials
Mountain bike brake pads can be made of different materials, each with its own strengths and weaknesses. Metallic pads are made of metal fibers and can be further classified as sintered or semi-metallic. Sintered pads are made of metal particles that are fused together under high pressure and heat. They are more durable than semi-metallic pads and can handle extreme riding conditions. Semi-metallic pads are a combination of metal fibers and other materials such as resin or kevlar. They are quieter than sintered pads but not as durable.
Organic pads are made of natural materials such as rubber, resin, and kevlar. They are softer than metallic pads and provide better modulation. However, they wear down faster than metallic pads and are not as durable.
Choosing the Right Brake Pads
When choosing brake pads for your mountain bike, consider the type of riding you will be doing and your personal preferences. Metallic pads are ideal for downhill and aggressive riding, while organic pads are better for cross-country and trail riding. Consider the weather conditions as well – metallic pads are better for wet and muddy conditions, while organic pads are better for dry conditions.
Also, consider the type of brake system on your bike. Disc brakes use different pads than mechanical or v-brakes. Hydraulic brakes require specific pads as well. Be sure to check the manufacturer’s recommendations before purchasing new brake pads.
In conclusion, understanding the different types of mountain bike brake pads and their materials is important when choosing the right ones for your bike. Consider the type of riding you will be doing, the weather conditions, and the type of brake system on your bike to make an informed decision.
Importance of Clean Brake Pads
Keeping your mountain bike’s brake pads clean is essential for maintaining optimal brake performance, control, and safety. Dirty brake pads can significantly affect your bike’s braking performance, which can lead to dangerous situations while riding. In this section, we’ll discuss the importance of clean brake pads and how they affect your mountain biking experience.
Better Braking Performance
Clean brake pads provide better braking performance than dirty ones. Dirt, grime, and oil buildup on the brake pads can create a film that reduces the pads’ friction against the rotor. This can lead to weaker braking power, longer stopping distances, and reduced control over your bike. Regular cleaning of your brake pads can help prevent this buildup and ensure consistent, reliable braking performance.
Increased Control
Clean brake pads also provide better control over your mountain bike. When your brake pads are dirty, they may not grip the rotor as well, making it harder to control your bike’s speed. This can be especially dangerous when riding downhill or in wet conditions. Clean brake pads ensure that you can slow down or stop your bike quickly and safely, giving you more confidence on the trail.
Enhanced Safety
Keeping your brake pads clean is crucial for your safety while mountain biking. Dirty brake pads can lead to reduced braking power, longer stopping distances, and decreased control over your bike. This can increase the risk of accidents and injuries while riding. Clean brake pads ensure that you can stop your bike quickly and safely when you need to, giving you peace of mind while on the trail.
In conclusion, keeping your mountain bike’s brake pads clean is essential for maintaining optimal braking performance, control, and safety. Regular cleaning of your brake pads will help prevent dirt and grime buildup, ensuring consistent, reliable braking performance. This will give you the confidence you need to tackle any trail with ease and safety.
Identifying Contaminants
When it comes to maintaining your mountain bike’s disc brake system, it’s important to be able to identify contaminants that could compromise the performance of your brake pads. Contaminants can include oil, grease, debris, and other substances that can build up on your brake pads and rotors over time.
One of the most common contaminants is oil. This can come from a variety of sources, including chain lubricants, hydraulic brake fluid, and even your own skin. Oil can cause your brake pads to become less effective and can even cause them to squeak or chatter when you apply the brakes.
Another common contaminant is grease. This can come from your bike’s drivetrain, or from other sources like the bearings or headset. Grease can be particularly problematic because it can be difficult to remove from your brake pads and rotors.
Debris is also a common contaminant. This can include dirt, dust, and other small particles that can get lodged in your brake pads and rotors. Over time, this debris can cause your brake pads to wear more quickly and can even damage your rotors.
To identify contaminants on your brake pads, you can visually inspect them for any signs of residue or buildup. You can also try rubbing your finger across the surface of the brake pad to see if it feels slick or oily. If you notice any signs of contamination, it’s important to clean your brake pads and rotors thoroughly to restore their performance.
Overall, being able to identify contaminants on your mountain bike’s brake pads is an important part of maintaining your bike’s disc brake system. By staying vigilant and keeping your brake pads clean, you can ensure that your bike is always ready to perform when you need it most.
Tools Required for Cleaning
To properly clean your mountain bike brake pads, you will need a few essential tools. Having the right tools on hand will make the cleaning process more efficient and effective. Here are the tools you will need:
- Disc Brake Cleaner: A good quality disc brake cleaner is essential for removing any dirt, grime, or debris from your brake pads. Look for a cleaner that is specifically designed for use on bike brakes.
- Paper Towels: You will need plenty of paper towels to wipe down your brake pads and remove any excess cleaner.
- Sandpaper: Fine-grit sandpaper is useful for scuffing up both the pads and calipers, which can help improve brake performance.
- T25 Torx Tool: Many mountain bike brake systems use T25 Torx bolts, so having a Torx tool on hand is essential for removing and installing brake pads.
- Torque Wrench with T25 Torx Bit: A torque wrench is necessary for tightening the bolts that hold your brake pads in place. Look for a wrench that comes with a T25 Torx bit.
- 2.5mm Allen Key: You may need an Allen key to adjust your brake calipers, depending on the type of brake system you have.
- Long-Nose Pliers: Needle-nose pliers are useful for gripping and manipulating small parts, such as brake pad retaining clips.
- Disposable Gloves: Wearing gloves will protect your hands from any chemicals or cleaners that you use during the cleaning process.
- Bike Stand: A bike stand is not strictly necessary for cleaning your brake pads, but it can make the process much easier. A stand will hold your bike steady and allow you to work on your brakes without having to hold the bike in place.
By having these tools on hand, you will be well-equipped to clean your mountain bike brake pads effectively and efficiently.
Preparation for Cleaning
Before you start cleaning your mountain bike brake pads, there are a few things you need to do to ensure that you are prepared for the task at hand. Here are some steps to follow:
- First, make sure your bike is in a stable position. You can use a bike stand or lean it against a wall. This will help you to work on the brake pads without the bike moving around.
- Next, remove the wheels from your bike. This will give you better access to the brake calipers and pistons. If you’re not sure how to remove the wheels, consult your bike’s user manual.
- Cover the brake discs or disc rotors with a clean cloth or a piece of cardboard. This will prevent any cleaning solution from getting on them and damaging them.
- Inspect the brake calipers and pistons for any signs of damage or wear. If you notice anything that looks out of the ordinary, it’s best to take your bike to a professional mechanic for a closer look.
- If you’re using a cleaning solution, make sure you have it on hand. Isopropyl alcohol is a popular choice for cleaning mountain bike brake pads as it leaves no residue and is safe on o-rings and seals.
- Wear gloves to protect your hands from any cleaning solution or debris that may come off the brake pads.
By following these steps, you’ll be well-prepared to clean your mountain bike brake pads. With a little bit of elbow grease and the right tools, you can keep your bike’s braking system running smoothly for longer.
Cleaning Brake Pads
Keeping your mountain bike brake pads clean is crucial for ensuring they work optimally. Dirt, grime, and oil can accumulate on the pads, reducing their effectiveness and potentially causing damage to both the pads and the rotors. Here’s how to clean your bike brake pads:
- Start by removing the wheel from the bike to access the brake pads.
- Use a clean cloth or paper towel to wipe the pads. If the pads are wet, wait until they dry before attempting to clean them.
- If the pads are particularly dirty, use a brake cleaner spray to remove any excess grime. Muc-Off is a popular brand of brake cleaner that many cyclists swear by.
- If the brake cleaner doesn’t do the trick, you can try using isopropyl alcohol. This is a great option for cleaning brake pads as it evaporates quickly and doesn’t leave any residue.
- If you’re using isopropyl alcohol, apply it to a clean cloth or paper towel and wipe the pads. Be sure to get into all the nooks and crannies to remove any dirt or debris.
- Once you’ve cleaned the pads, wipe them down with a clean cloth or paper towel to remove any excess cleaner or alcohol.
- Reinstall the wheel and test the brakes to make sure they’re working properly.
It’s important to note that you should never use water to clean your brake pads. Water can cause the pads to rust and can also contaminate the braking surface, reducing their effectiveness. Stick to using brake cleaners or isopropyl alcohol for the best results.
In summary, cleaning your mountain bike brake pads is an important part of bike maintenance. Use a clean cloth, brake cleaner, or isopropyl alcohol to remove any dirt or grime from the pads, and avoid using water. By keeping your brake pads clean, you’ll ensure they work optimally and last longer.
Cleaning the Caliper and Pistons
To clean the caliper and pistons, you will need a clean cloth, brake cleaner, or isopropyl alcohol. Before cleaning, make sure the caliper is cool to the touch to avoid any burns.
Start by removing the wheel and brake pads. Then, use a clean cloth to wipe down the caliper, removing any dirt or debris. If the caliper is particularly dirty, you can use a wet cloth or brake cleaner to help remove stubborn grime.
Next, focus on the pistons. Use a clean cloth to wipe them down, removing any dirt or debris. If the pistons are stuck or difficult to move, avoid using excessive force. Instead, try spraying a small amount of brake cleaner or isopropyl alcohol around the pistons to help loosen them up.
Once you have cleaned the caliper and pistons, use a clean cloth to dry them off. Make sure there is no residual cleaner or water left on the parts, as this can cause issues with braking performance.
Overall, cleaning the caliper and pistons is an important step in maintaining your mountain bike’s braking system. Regular cleaning can help prevent issues with brake performance and extend the life of your brake pads.
Reinstalling the Brake Pads
Now that you have cleaned your mountain bike brake pads, it’s time to reinstall them. Here’s how you can do it:
- Begin by inserting the brake pads into the brake calipers. Make sure that they are correctly aligned with the rotor.
- Tighten the caliper bolts using a torque wrench. Ensure that you follow the manufacturer’s recommended torque setting. Tighten the bolts in a crisscross pattern to ensure even pressure on the caliper.
- Check that the brake pads are centered on the rotor. This can be done by spinning the wheel and ensuring that the gap between the rotor and each brake pad is equal.
- If necessary, adjust the brake caliper position to center the brake pads. Loosen the bolts and move the caliper until the pads are centered on the rotor.
- Once you have centered the brake pads, tighten the caliper bolts again to the recommended torque setting.
- Finally, bed in your brake pads by gradually increasing the braking force over several stops until they have reached their full stopping power.
Remember, proper installation of brake pads is crucial for the braking system to work effectively. Always follow the manufacturer’s instructions and recommended torque settings when reinstalling brake pads.
Post-Cleaning Maintenance
Now that you have cleaned your mountain bike brake pads, it’s time to focus on post-cleaning maintenance. This is important as it will ensure that your brakes continue to perform optimally and provide you with the braking performance you need.
One of the most important things to keep in mind is to maintain your brake pads regularly. This will help to ensure that they remain in good condition and provide you with the braking performance you need. You should check your brake pads regularly and replace them when they become worn.
In addition to this, you should also pay attention to the lever feel of your brakes. This is important as it will help you to determine whether your brakes are working properly or not. If you notice that your brakes are feeling spongy or soft, you may need to bleed your brakes.
Another important aspect of post-cleaning maintenance is to bed in your brakes. This is important as it will help to ensure that your brakes are working optimally and providing you with the braking performance you need. To bed in your brakes, you should start by accelerating to a moderate speed and then apply your brakes firmly. Repeat this process several times until you notice that your brakes are working properly.
Finally, you should also make sure that you clean your bike regularly. This will help to ensure that your bike remains in good condition and that your brakes continue to perform optimally. You can use a bike cleaning solution to clean your bike and make it shine.
By following these post-cleaning maintenance tips, you can ensure that your mountain bike brake pads continue to perform optimally and provide you with the braking performance you need.
Troubleshooting Common Issues
If you’re experiencing issues with your mountain bike brakes, there are some common problems that you can troubleshoot. Here are some tips to help you diagnose and fix common issues:
Squealing or Noisy Brakes
If your brakes are squealing or making noise, the most common cause is contamination of the brake pads or rotors. This can happen if oil, dirt, or other debris gets on the braking surface. To fix the problem, you can try cleaning the brake pads and rotors with isopropyl alcohol using a clean rag or spray bottle. Another solution is to replace the brake pads or rotors if they are too contaminated or worn out.
Leaking Brakes
If you notice any fluid leaking from your hydraulic disc brakes, this could be a sign of a problem with the brake system. Check the brake fluid level and make sure it’s topped up. If the fluid level is low, you may have a leak that needs to be repaired. You can also check the brake lines for any damage or wear and replace them if necessary.
Warped Rotors
If your brake rotors are warped, you may feel a pulsing or vibration when you apply the brakes. This can be caused by overheating the rotors or by hitting them too hard. To fix the problem, you can try resurfacing the rotors or replacing them if they are too damaged.
Lack of Control
If you feel like you don’t have enough control over your mountain bike brakes, there could be a few different causes. One possibility is that the brake pads are worn out and need to be replaced. Another possibility is that the brake calipers are not properly aligned with the rotors, which can cause uneven braking. You can adjust the calipers to fix this problem.
Mechanical Disc Brakes
If you have mechanical disc brakes, you may experience some common issues such as rubbing or squeaking. This can be caused by a number of factors, including worn brake pads, loose or misaligned calipers, or contaminated rotors. To fix the problem, you can try adjusting the calipers, cleaning the rotors, or replacing the brake pads.
By following these troubleshooting tips, you can diagnose and fix common issues with your mountain bike brakes. Remember to always wear protective gear and exercise caution when working on your bike.
When to Visit a Bike Shop
Even if you are an experienced cyclist, there are times when you may need to visit a bike shop to have your brake pads checked and serviced. Here are some situations where it is recommended to take your bike in for a professional check-up:
- After a long, steep descent: If you’ve been riding down a long, steep hill, your brake pads may have worn down faster than usual. It is important to have them checked and replaced if necessary to ensure your safety on future rides.
- When your brake pads are too thin: Brake pads have a minimum thickness, and if they wear down below this point, they will need to be replaced. If you are unsure if your brake pads are too thin, a bike mechanic can measure them to determine if they need to be replaced.
- If your brake pads are contaminated: Contaminated brake pads can reduce stopping power and cause noise. If you have accidentally sprayed chain lube on your brake pads or if there is debris on the pads, it can cause contamination. A bike mechanic can clean or replace the pads as needed.
- When your cable system needs adjustment: If your brakes feel spongy or do not engage properly, it may be due to a loose cable. A bike mechanic can adjust the cable tension to improve brake performance.
- If your brake discs or disc rotors are damaged: If your brake discs or rotors are warped or damaged, they can cause vibration or noise when you apply the brakes. A bike mechanic can inspect the discs and rotors and replace them if necessary.
- If your seals need to be replaced: Seals help to keep dirt and water out of your brake system. If they are damaged or worn, they can allow contaminants to enter the system and reduce brake performance. A bike mechanic can replace the seals as needed.
Overall, if you are unsure about the condition of your brake pads or if you are experiencing any issues with your bike’s braking system, it is recommended to visit a bike shop to have them checked and serviced by a professional.
Final Thoughts
In conclusion, keeping your mountain bike brake pads clean is an essential part of bike maintenance. Dirty brake pads can cause poor braking performance, which can lead to accidents and injuries. By following the steps outlined in this article and using the right tools, you can ensure that your brake pads are always clean and in good working order.
Remember to always wear gloves when handling brake pads to prevent contamination from oils and dirt on your hands. Use lint-free towels and isopropyl alcohol to clean your brake pads and rotors thoroughly. If you notice any signs of wear or damage, such as cracks or uneven wear, it’s best to replace the brake pads immediately.
Regularly cleaning your bike’s brake pads is an easy and effective way to improve your bike’s overall performance. By taking the time to clean your brake pads regularly, you can extend their lifespan and ensure that your bike is always safe to ride. So, make sure to add brake pad cleaning to your regular bike maintenance routine, and enjoy a safer and smoother ride.
Frequently Asked Questions
How can I clean my bike’s disc brake pads?
Cleaning your bike’s disc brake pads is a crucial maintenance task to ensure they function properly. You can clean them using isopropyl alcohol or brake cleaner spray. First, remove the wheel and pads from the caliper. Then, use a clean rag and the alcohol or spray to wipe the pads clean. Be sure to avoid getting any cleaner on the rotor or caliper.
What is the best cleaner for mountain bike brake pads?
The best cleaner for mountain bike brake pads is isopropyl alcohol or brake cleaner spray. These cleaners are safe to use on the pads and are effective at removing any debris or contaminants that may be affecting their performance.
Is it safe to wash brake pads?
No, it is not safe to wash brake pads with water or any other liquid. Water can cause the pads to become contaminated and affect their performance. Instead, use isopropyl alcohol or brake cleaner spray to clean the pads.